Fetch
This page is for people who will be using Fetch (on a Mac) to transfer files. People using PC Windows machines should refer to the pages about file transfer using WS_FTP. Access privileges to an FTP server must be established prior to using Fetch to transfer files.
Prerequisites:
An understanding of the concept of file transfer
A copy of the program Fetch
- FETCH can be downloaded at the Fetch Softworks or http://www.shareware.com/. (Type in Fetch, select Macintosh as the platform, and click on the Search button. This is a good place to find shareware software in general.) A 15-day free trial copy can be downloaded. Educators can also apply for a free license for Fetch.
Purpose:
- To learn how to use the program Fetch
- To upload and download files to and from a remote computer
Lesson:
Table of Contents for Lesson
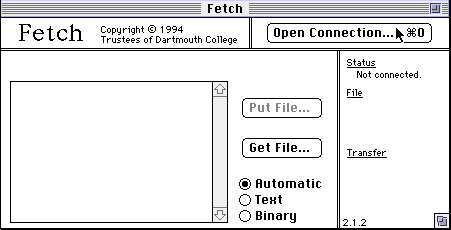
![]() Fetch is a Macintosh
program for transferring files. It uses the File Transfer
Protocol (FTP) from a remote machine to your local machine or
from your local machine to a remote machine. Fetch is free to
users affiliated with an educational institution or
charitable non-profit organization.
Fetch is a Macintosh
program for transferring files. It uses the File Transfer
Protocol (FTP) from a remote machine to your local machine or
from your local machine to a remote machine. Fetch is free to
users affiliated with an educational institution or
charitable non-profit organization.
For those who have never worked with Fetch, written instructions and tutorial animations are provided to learn how to use the program. These tutorial animations are demonstrations of how to accomplish certain functions, as if the instructor was in the room demonstrating the task. Tutorial animations for Fetch require Shockwave to run. Directions on how to download Shockwave and a list of the animations available are found on the page.
Downloading a File
 Tutorial
animation available
Tutorial
animation available
- Start your FETCH application.
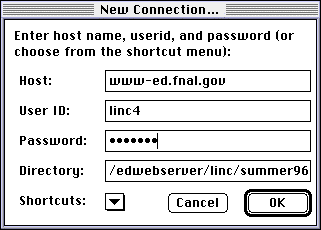
- The "open connection" box pops up to allow you to enter
host, user ID & password. Find out from your
instructor what host, user ID, password, and directory you
should be using for your course. Note: If this box does
not pop-up when you start Fetch, you can get it by using
the FILE menu and selecting New Connection.
The information given on the graphics on this page is
for demonstration purposes only. You will need to use
the host name, user ID, password, and directory given by
your facilitator.
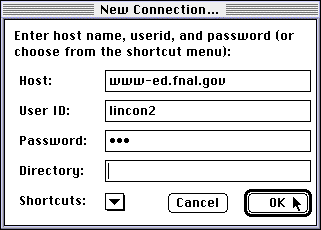
- Enter the host (can be letters or numbers).
- Enter the user ID (or put "anonymous").
- Enter the password if there is one, (could be your e-mail address), or leave it blank.
- Indicate a directory if one is known--pub is frequently used as a directory accessible to the public. If you are not sure, it is best to leave the directory blank. You can browse through the directories and files and pick the one you want once you are connected.
- Once you are "in" (connected), Check that your transfer
format at the lower middle of your Fetch window has the
Automatic mode selected (as opposed to "Text" or
"Binary").
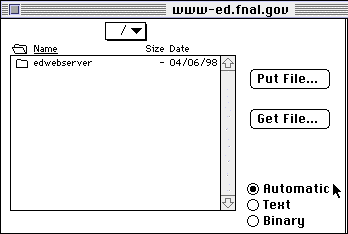
- Next, go to the file you want by double-clicking and opening directories/folders. You can get the file by double-clicking on it, or by clicking on it once to select it and then using the Get File button.
- Then a file selection dialog box will pop up that lets you select the folder and file name where you want to save the file you are getting. Pick the location (folder and file on your machine) where you would like to put the file you are fetching.
- Your ability to put a file is not available on most sites. Most sites only allow you to get a file but not put a file.
- You must close the connection when you are finished so other people can use the connection. You can close the connection by using the FILE menu and selecting Quit or by clicking on the Close Connection button in the top right corner of the FETCH window (if present).
Downloading a Whole Folder at a Time
Tutorial
animation available
- Read the section about downloading a file.
- Start your FETCH application and fill in your host, user ID, password, and directory the same as in the downloading a file instructions. The information given on the graphics on this page is for demonstration purposes only. You will need to use the host name, user ID, password, and directory given by your facilitator.
- Once you are connected, double-click to open the
folders needed to get to the folder you want to download.
When you find the folder you want to download, click
once on it to select (highlight) it. Do not
double-click on it because we do not want to open the
folder.
As an example, if you were trying to get the whole folder named templates from Fermilab (which is in the edwebserver folder and then in the lincon folder), you would:
- Double-click on edwebserver folder to open it.
- Double-click on lincon folder to open it.
- Click ONCE on templates folder to select/highlight it.
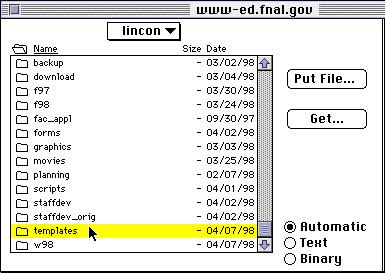
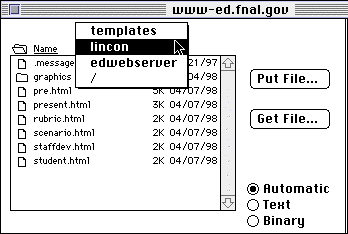
If you double-click accidentally on the name of the folder that you want to download, you can get back to the containing folder by using the menu in the top middle of your Fetch window to select the previous folder you were in.
- Now from the Remote menu, choose Get
Directories and Files.
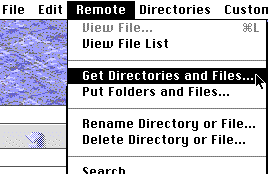
- In the file selection dialog box that pops up, click on the Desktop button, and then select your hard drive; use the existing folder name or type in a new name if you prefer, and click on Save. The whole folder will now be transferred from the remote computer onto your computer.
Activity:
If you feel you would like some practice using Fetch by downloading a file or folder, try one from the following location:
(Place the file on your desktop for easier discard later.)
- various fairy tales: host address: ftp.funet.fi, user
id: anonymous,
path or directory: /pub/doc/literary/etext/fairy-tale
Uploading Files and Folders
|
|
|
|
|
|
The Basics of Uploading Files
- Start or open Fetch.
- Your New Connection window may pop up
automatically. If so, skip to the next step. If not, click
on the Open Connection button when the Fetch window
pops up. If your Fetch window does not have this button,
use the File menu and select New Connection
instead.
- Fill in:
- the name of the remote computer you want to put files on.
- your user ID.
- your password.
- the folder path or directory on the remote computer you want to put your files. Here is an example:
Leave the Directory field blank if you don't know what folder path you want to be in on the remote computer. You can always browse through the folders on the remote computer after you are connected.
- Now that you are connected, make sure that your Fetch
will not add suffixes (like .txt and .bin) to the files you
will put on the remote machine. Do this by clicking on
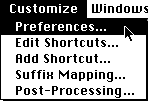
Fetch's Customize menu, selecting Preferences
and then selecting the topic Uploading in the dialog
box. Make Sure the Box to Add File Format Suffixes is
Unselected (has no X in it)!
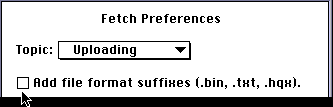
If this box is checked, Fetch will add ".txt" to the file name of every HTML file you upload and Fetch will add ".bin" to the name of every graphic file you upload. This is not good, because then your links and images will be broken. If you upload myfile.html and myfile.gif and notice that what appears on the remote computer is myfile.html.txt and myfile.gif.bin, then your file format suffix preferences need to be changed.
- The next thing you should check is the name of the
folder or file you are about to upload. Remember it should
contain
No Spaces, No Slashes, No # Sign
No Other Unusual Characters ( < > ) ? & ...Please rename your folder or file if it does not follow these rules.
- Also, try to use a name that will be unique to you. For
example, the folder names "html" or "Project" or the file
name "homepage.html" are not very unique, so using names
like these is "asking for trouble."
- When you get onto the remote computer, select folders
until you get to where you want to upload your file(s).
- Take a look at the files/folders that are already on
the remote computer and
Make Sure You Do Not Overwrite Someone Else's Work by uploading a folder or file with the same name. Rename your local folder or file if you need to.
- If you are uploading a single file, use the
 button on Fetch's
first screen, and select the file on your local computer
that you want to upload.
button on Fetch's
first screen, and select the file on your local computer
that you want to upload.
- Use the
 button to close your connection.
URL for Your Uploaded Files
If you have uploaded files onto a machine that is a Web server, and you have uploaded your files into a folder that is served by that machine's Web server, then you can immediately use Netscape to look at the files you just uploaded.
But what is the URL? Your URL is
-
-
computer.domain.type
is the name of the computer you just uploaded your file
to. (Example: www-ed.fnal.gov)
-
/folder1/folder2/ is
the name of all the folders you went through on the
remote machine when you were selecting where to upload
your files/folder. (Example: /linc/spring96/projects_linc2/scavhunt/)
- filename.html is the name of one of the files you uploaded. (Example: start.html)
So for the example above, say I uploaded a folder called scavhunt that contained a file called start.html. I uploaded the folder onto www-ed.fnal.gov inside of the linc/spring96/projects_linc2 folder. The URL would be:
Using this as a guideline, what URL would you use to look at the files that you just uploaded?
Remember that if you change your files, you must use Fetch to upload the changes, AND you must use your browser's RELOAD button to refresh your page and look at any changed files you uploaded.
Uploading a Folder Instead of a File
If you want to upload a whole folder:
-
- Select Put Folders and Files from Fetch's
Remote menu.

- Find the folder you want to upload on your local
computer, click once on it to select it, and
Add it to the list of items to upload.
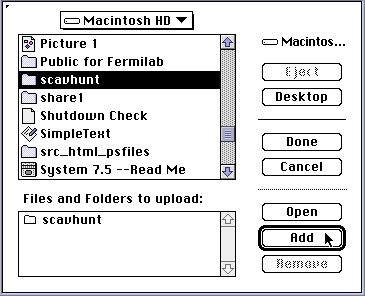
- Then press the
 button when you are finished adding folders or
files to your list.
button when you are finished adding folders or
files to your list.
- When the Format Dialog Box pops up, choose Text
format for "Text" files and Raw Data format for
"Other Files." ("Other Files" in this case may mean your
gif and jpeg image files.)
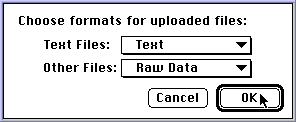
After you select formats, Fetch will transfer your folder(s) or file(s).
Deleting or Renaming a Folder or File
- Find the file or folder on the remote computer that you
want to delete or rename. Click once on it to select
it.
- Use the Remote menu to select Delete
Directory or File or Rename File.

- If you are deleting, Fetch will ask you if you are sure you want to delete. If you are renaming a file, Fetch will ask you for the new name.
Once you have the rights on the remote server to upload, you are ready to place files in the directory or directories indicated. This will apply to pages to be placed in your portfolio or to your project pages. Check with your facilitator for the correct login, ID, etc. that will allow you permission to upload to your course server.