Using Raw HTML to Write and Edit
Your Web Pages to Supplement an
Editor or without Using an Editor
Prerequisite:
- Know basic computer concepts
Purpose:
To obtain what is necessary to start writing Web pages
To write HTML documents containing text content and proper HTML formatting tags (headers, lists, paragraph, horizontal rule, character formatting, addresses . . . )
Adobe PageMill is the recommended software for our Web pages. Sometimes your Web page may not look the way you want it to. If you can not correct the problem in PageMill the Document Source may help. The source is shown in HTML (HyperText Markup Language).
The following HTML tags are meant to supplement Adobe PageMill and not replace it. It is not a complete list and is not meant to be one. The purpose of including a list is to help the participants edit their Web pages. Therefore, a partial list of authoring tags are included to assist you.
 RAW HTML TABLE OF CONTENTS
To start a new page:
<HTML>
<HEAD>
<TITLE> name of page </TITLE>
</HEAD>
<BODY></BODY>
</HTML>
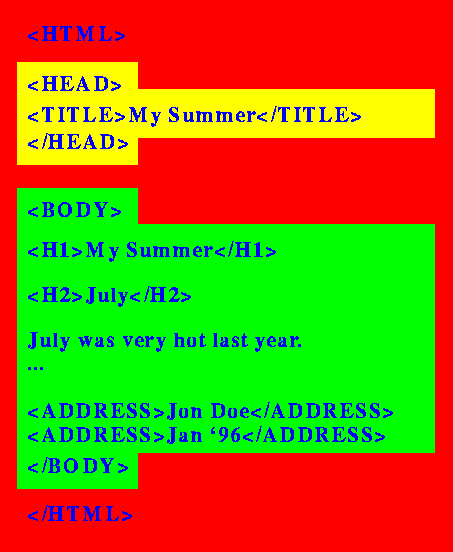
To see a picture of the structure of an HTML document:
An HTML document starts with <HTML> and ends with </HTML>. In other words, it's just one large <HTML> </HTML> tag which encloses the whole file.
Inside this, there are two sections:
- Heading (HEAD)
- Contains information about the file (like the title).
- Body (BODY)
- Contains the content of the file.
Your HTML tags and page content should appear in the BODY section of your document; that is, only in the green section between the <BODY> and </BODY> tags.
You can put title and other non-content information inside the (yellow) HEAD section of the document.
You should not write anything outside those sections; that is, you should not write anything in the red areas of the document.
Within the body of the document, you can look at:
change the heading size:
<H1></H1> largest
<H6></H6> smallest
change the placement:
<P ALIGN=CENTER></P>
<P ALIGN=RIGHT></P>
paragraph:
<P></P>
create a list:
<UL> bullet list
<L1> first item in a bullet list
<L2> second item
</UL>
<OL> numbered list
<L1> first item
<L2> second item
</OL>
keep text together:
<BLOCKQUOTE></BLOCKQUOTE>
change color of the font:
<FONT COLOR="D91016"></FONT> will give a reddish text.
<FONT COLOR="7E7E7E"></FONT> will give a grayish text.
change the background color:
<BODY BGCOLOR=#FFFFFF"></BODY> will give a white background.
skip a line:
<BR> break
insert a line break:
<P> <HR ALIGN=LEFT></P> sample
RAW HTML LINKS
To link your Web page to other Web sites, e-mail addresses, and other online pages, you will use the <A> tag. You will also need the URL name for the link.
Linking to Other Documents
The chief power of HTML comes from its ability to link regions of text (and also images) to another document. A "local" link is a link to a document on your own computer as opposed to a link to document on another computer across the network. The browser highlights these regions (usually with color and/or underlines) to indicate that they are hypertext links (often shortened to hyperlinks or simply links).
HTML's single hypertext-related tag is <A>, which stands for anchor. To include an anchor in your document:
- Start the anchor with <A . (There's a space after the A.)
- Specify the document that's being pointed to by entering the parameter HREF="filename" followed by a closing right angle bracket: >
- Enter the text that will serve as the hypertext link in the current document.
- Enter the ending anchor tag: </A>
Here is a sample hypertext reference:
<A HREF="MaineStats.html">Maine</A>
This entry makes the word "Maine'' the hyperlink to the document MaineStats.html, which is in the same directory as the first document.
- First, type: <A HREF="location name goes here">.
- Second, type the words that will be the highlighted text.
- After this type </A>.
Example: <A HREF="http://www.link.com/train.html">Train page</A>
This simple, but powerful tag enables your reader to travel anywhere on the Internet. The <A> tag creates the link. The HREF attribute stands for Hypertext Reference. After HREF=" is the location or URL for where you are linking to followed by the ending quote ("). The text or image that follows should be active.
NOTE: Make sure you have the URL case sensitive and complete. If there is even the slightest error the link may not work.
To create an e-mail link:
- First, type: <A HREF="mailto: the e-mail address">. The text will probably be the e-mail address, then </A>. Again it is similar to the linking of Web pages except for the mailto: before the e-mail address. NOTE: There is no space between the colon and the e-mail address. Example: <A HREF="mailto:ilinc@train.com">mailto:ilinc@train.com</A>
RAW HTML LINKS TO THE
INTERNET
You will follow the same procedure for linking pages to the Internet.
RAW HTML ANCHORS (LINKS WITHIN A PAGE)
Using the NAME attribute enables you to create links to certain sections of your Web page. You need to decide where on your page you will send the reader. On this page, if you had clicked on the HTML Format Tutorial, you were sent to the title of this section. The destination of the link is anchored by NAME. When writing your page, the destination must be surrounded with the tags <A NAME="the designated text"> and </A>.
First, go to the designated text, for example, "HTML," and surround it with the tags <A NAME="HTML"> and </A>. Note: the space between the A and NAME, the use of the quotation marks and inequality symbols, and ending with just the </A>.
Next, go to the text you want to link from and surround it with the tags <A HREF="#HTML"> and </A>. Note: the change to HREF and the # sign before the designed text reference name.
Click on the link and the reader should see the designated text now on the top of the page instead of having to scroll down your Web page.
RAW HTML WITH GRAPHICS
Inline Image
An inline image is an image that appears on your page. You do not have to click on a link to get the image. Images take longer to load than text so you should think carefully about the size and number of images you choose for your pages. HTML source code for an image looks like the following:
<IMG SRC="mydog.gif">
What goes between the quotes is the URL for the image file.
If you do not have Adobe PageMill, then you would use a text editor, such as SimpleText on a Macintosh, and type the HTML. For this example, the HTML is "<IMG Align=Top SRC="graphics/dir.gif">. You can add ALIGN=TOP or ALIGN=MIDDLE to your command to align the image next to text on the same line. You can also add ALT="alternate text" to take care of users who don't display graphics. For example, <IMG SRC= "graphics/write_graphics1.gif" ALIGN=MIDDLE ALT="Fermilab Logo">.
More HTML for Images
These additional commands make the graphics on your pages look much nicer. Here are two examples: Here is an example of
using the ALIGN="RIGHT" modifier to display an image. You notice the text is wrapped around the image that appears on the right-hand side. You can put the command any place in the text that you want, even in the middle of a sentence. Just experiment and see how it looks. You can add breaks in the text or new paragraphs as well (e.g., <BR>or <P>). The HTML to display this image is: <IMG ALIGN="RIGHT" SRC="graphics/write_graphics1.gif">.
A helpful command to use when you are using right- and left-aligned images is <BR CLEAR=ALL>. It forces a break in the text so that subsequent text does not continue to wrap around a large image. Look at the difference in how the text wraps around the images with and without the command.
Without the Command
If I have a new heading, I cannot get the new heading to start after the
picture of the ball where I want it.
Failed New Heading
With the <BR CLEAR="ALL>" Command
If I use the <BR command before the new heading, I can get the new
Successful New Heading
 Using the Images:
Good Web pages should be easy to read while being attractive to see. Place your images, buttons, bars, etc. to draw the reader's eye. Remember that not everyone will be using the same hardware and software to view as you used to create your project Web pages. If possible, look at your Web pages with various computers, monitors, and Internet connections. Look at different Web pages on the Internet to obtain different ideas for your Web pages.
You can read about more commands to control displaying images by referring to The Bare Bones Guide to HTML site and clicking on the HTML sections on graphics.
This was just a list of the basic tags. If this caused you
to think about other possibilities, here are some Web sites
that extend the basics:
HTML Code Turtorials http://www.htmlcodetutorial.com/
Getting Started with HTML http://www.w3.org/MarkUp/Guide/
Task:
 Try doing
your own search for more on HTML basics and send your results
according to your facilitator's instructions, if assigned to do
so.
Try doing
your own search for more on HTML basics and send your results
according to your facilitator's instructions, if assigned to do
so.